Wednesday, August 11, 2010

ITW Nexus, a DIYers best friend!


Here is something that anyone who is into making their own DIY Tactical or outdoor gear, or for those that like to modify what they have, should never be without. A big ol bag of ITW Nexus hardware!! Everything in this bag I have used in one way or another. I have made my own lashing straps with the normal 1" fastex buckles. I have used web dominators on every pack I own. I have grimlocks on just about everything I have molle or pals webbing on. You name it, I have thought of a use for it.

A lot of the items in tis bag have been or will be used in my posts. A few of the posts I have coming up will show how I used them to modify items to make them, in my own opinion of course, better.

I buy most of mine from the Supply Captain, but I have seen them sold everywhere. Even on ebay, I believe the Supply Captain is the one on ebay you can find them through actually. I'm not sure how to find the company itself, the ITW Nexus site and the ITW Fastex site have no trace of these products. Could be you have to contact them to find out what is in their military line.

Below will be pics of the items I have on hand right now. I will always get more of these items, simply because the company is amazing and their quality is top notch.

1" GT surface mount side release buckles in foliage.
1" GT side release buckle permanent in foliage.

1" QASM (quick attach surface mount) buckles in tan.
Web Dominator in coyote.
1" ladder loc, permanent in foliage.
1" D ring in foliage.
1" side release field expedient buckles in coyote.
Grimlocks in coyote, foliage and black.

Friday, August 6, 2010

Kifaru Compression Stuff Sack, sleeping bag size.


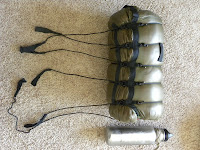
Here is my Kifaru Regulator compression stuff sack. Though it does not house a Kifaru regulator sleeping bag, it is still the best compression sack I have ever used! Unlike most stuff sacks that make things into tight little balls, this one compresses around the circumference of the bag. Letting you lay it flat in the bottom of your pack, where it won't cause hot spots on your back. These stuff sacks are made out of very lightwieght materials that are also very strong. The material they use is their Rhino Hide material. Only comes in coyote brown, which doesn't bother me at all.

Some size comparison shots with the Klean Kanteen. Here is my Wegenr 30 degree mummy bag in it's normal stuff sack

As you can see, pretty normal size for a no compressed bag. Although it has been in my compression sack and I feel it didn't come back to the full size it once was yet.


And here it is in the compression sack. As you can see, quite a dramatic difference. Even though this is an older bag that does not compress like I would like it to. But it does make it a manageable size for my pack, as well as making it fit where it should in my pack. I will include some detail shots of the sack to end this post. I highly recommend checking out Kifaru, they are a small company with big ideas on tactical packs!

Logo patch detail.
 
The stuff sack by itself.


The cord storage pocket.

Voodoo Tactical Medic Pouch. Blow out bag on a budget!

I'm going back to school to become a paramedic starting at the end of this month. It is something I have wanted to do for a very long time but have always pushed it aside. Maybe through fear of failure, or just laziness. Either way no more, I am going to do what I want to do, and what I feel passionate about.

That said it should come as no surprise that I feel everyone should have a blow out bag aka IFAK somewhere close by at all times. There are a lot of great kits and pouches on the market these days. But for someone who might feel bad about spending $65 plus on a pouch, here is a low budget pouch that can hold pretty much all the necessary items and only cost around $15 retail.


So here is the front view of the Voodoo Medic pouch. As you can see I have added a couple things. I have a pair of trauma shears in the molle on the front. Also I have a Milspec Monkey velcro patch panel on there as well. Also the Milspec Monkey tactical medic patch in ACU Dark color scheme.


Here are a couple size comparison shots with my old Klean Kanteen. As you can see the pouch is not very large, aprox. 8" tall, 6" wide and 4" deep.

The pouch open and laid out, full of it's contents. I have most everything you need in it at the moment. Only thing missing is a good tourniquet, and chest seals. Though all the plastic bags in there can be used as chest seals.


The contents of the bag, 1x small glove pouch. 1x roll of medic tape. 1x trauma shears. 1x ace compression bandage sealed. 1x roll of gauze. 1x large roll of kirlex. 1x bent nose hemostats. 2x small field dressings. 1x latex band tourniquet. 2x 12 hour chem lights (glow sticks). 1x Streamlight stylus flashlight.


Also marking your bag for easy identification is a must! I have mine marked with a red paracord zipper pull, and the Milspec Monkey Spartan medic patch.

The bag is not the heaviest material, maybe 500D nylon. But for an everyday, throw it in your pack, or glove box pouch. It works well. I have not had any issues with it and I have been carrying it for about 3 months. I did cut the elastic that went between both sides of the pouch when open. It hindered the opening far too much. I want to do my own system that will keep it half way open when on a vest or plate carrier. But that can also be laid flat if need be. If I figure it out I will edit this post and show you.


Thursday, August 5, 2010

D.I.Y. Alcohol Stove from an aluminium bottle.

So the alcohol stove craze is nothing new. I have seen countless posts on youtube, blogs and forums on how to make them. I'm not going to do a huge post about how to, just a few shots of me making one quickly just for kicks.

Here are some basic tools you'll need to do one pretty much strictly by hand. Tin snips, a couple triangle files, Measuring tape, large drill bit, 1/8" drill bit, 1/16" drill bit. Not pictured, drill, pop rivet gun and pop rivets, flat file.

 I started with a Venom energy drink bottle, cut the top off, and the bottom. Measured out to fit together of course. also making three notches in the top to let the fuel into the inside wall of the finished stove. Made them with the triangle files.

Here is a detail shot on the notches in the top of the bottle.

Here is the stove after being forced together and pop riveted. I prefer using JB Weld but I was trying to hurry on this one.

Here is the inside of the stove after it was finished, you'll notice it has those notches inside to let the fuel flow into the inside wall.

My preferred fuel is denatured alcohol. I dye mine purple so it doesn't get mixed in with anything else in my pack. it looks black here but it's not. a drop of blue and red food coloring works wonders.

Look close and you can see the flames wrapping around the pot. I used stainless pot that I had in the garage, not my backpacking kitchen pot. (didn't want to dig it out.)

The water boiling after about three and a half minutes! Not too bad at altitude. (remember, I live at 5280, so home has altitude here!)

Make yourself a stove, it's fun, and super light for your backpacking kitchen! One thing I always say is, try to make your own gear, but don't be afraid to buy something you need!

Wednesday, August 4, 2010

Upcoming Posts

U.T.G. Tac vest review
Voodoo Tactical Medic Pouch review
U.S. Army Issue ACU 5.56 mag shingles review
U.S. Army Issue ACU medic pouch review
Voodoo Tactical 12ga. shotgun ammo pouch Review
Voodoo Tactical 9mm ammo pouch review
Voodoo Tactical Tobago Large Tactical Assualt Pack review
Maxpedition/MilSpec Monkey Monkey Combat Admin Pouch review
Kifaru Compression Regulator Stuff Sack review
Emerson Knives Commander review
Ontario Tak Knife review
D.I.Y. alcohol stove
My own designs in paracord

and many, many more!

First post in my new gear blog!

Call me a gear geek, fanatic, junkie, wierdo. Call me what you will but I love gear!! Tactical gear, camping gear, hiking gear, tech gear, everyday gear! I just love gear!!

This will be my blog to show off my gear, rate my gear, review my gear.

So thanks for stopping by and feel free to comment and what not!